
Building a multi-level PO approval workflow, in NetSuite - part 3
SuiteApprovals, SuiteFlows, and everything in between.

In this guide, we’re going to:
Successfully build a multi-level PO approval workflow in NetSuite using SuiteFlow [you are here]
SuiteFlow
Before we start, we need to enable Approval Routing on POs. This is a system level feature that enables the editing & reading of the Approval Status field. If it’s not enabled, this field will always come back as null.
Go to Setup→Accounting→Accounting Preferences. Click on the “Approval Routing” tab on and check “Purchase Orders”:

With that out of the way, let’s build our first SuiteFlow!
Go to Customizations→Workflow→Workflows→New
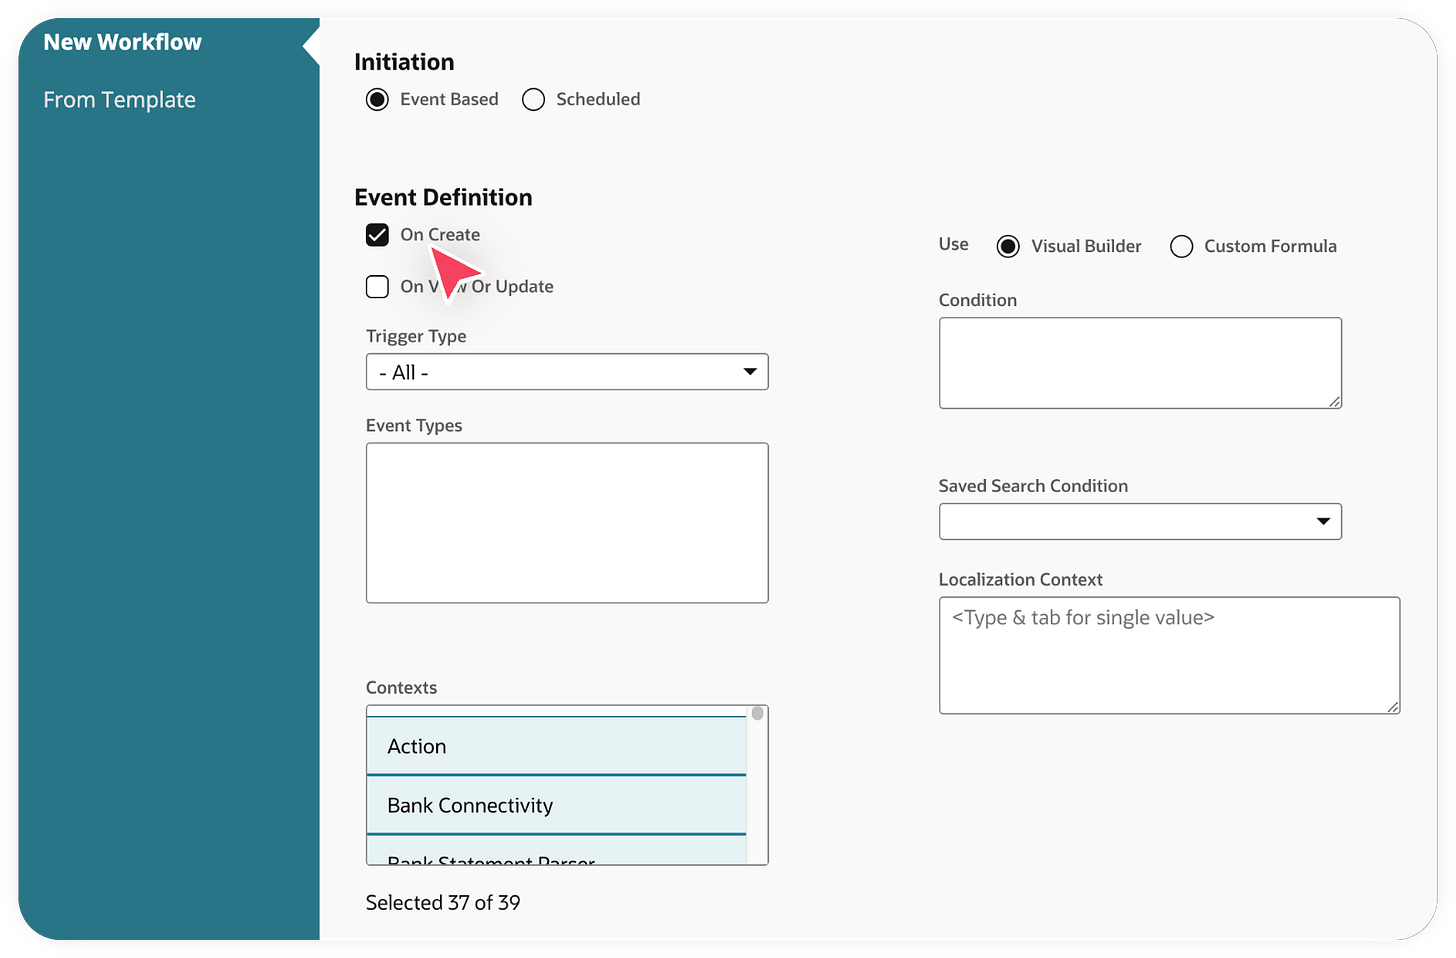
A PO is a type of Transaction. Set the fields accordingly:

Don’t forget to enable logging; this will come in handy later. And we want the workflow to be triggered when a PO is created:
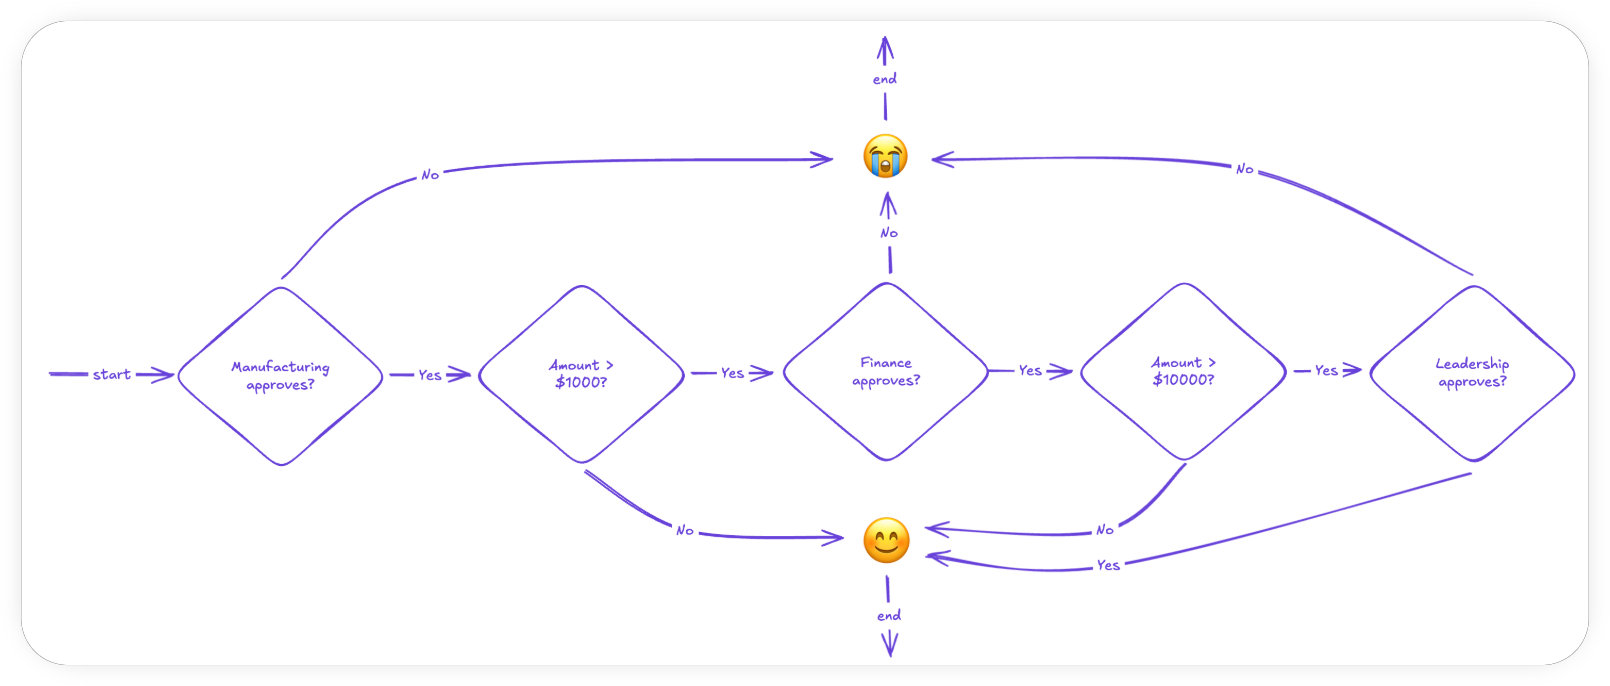
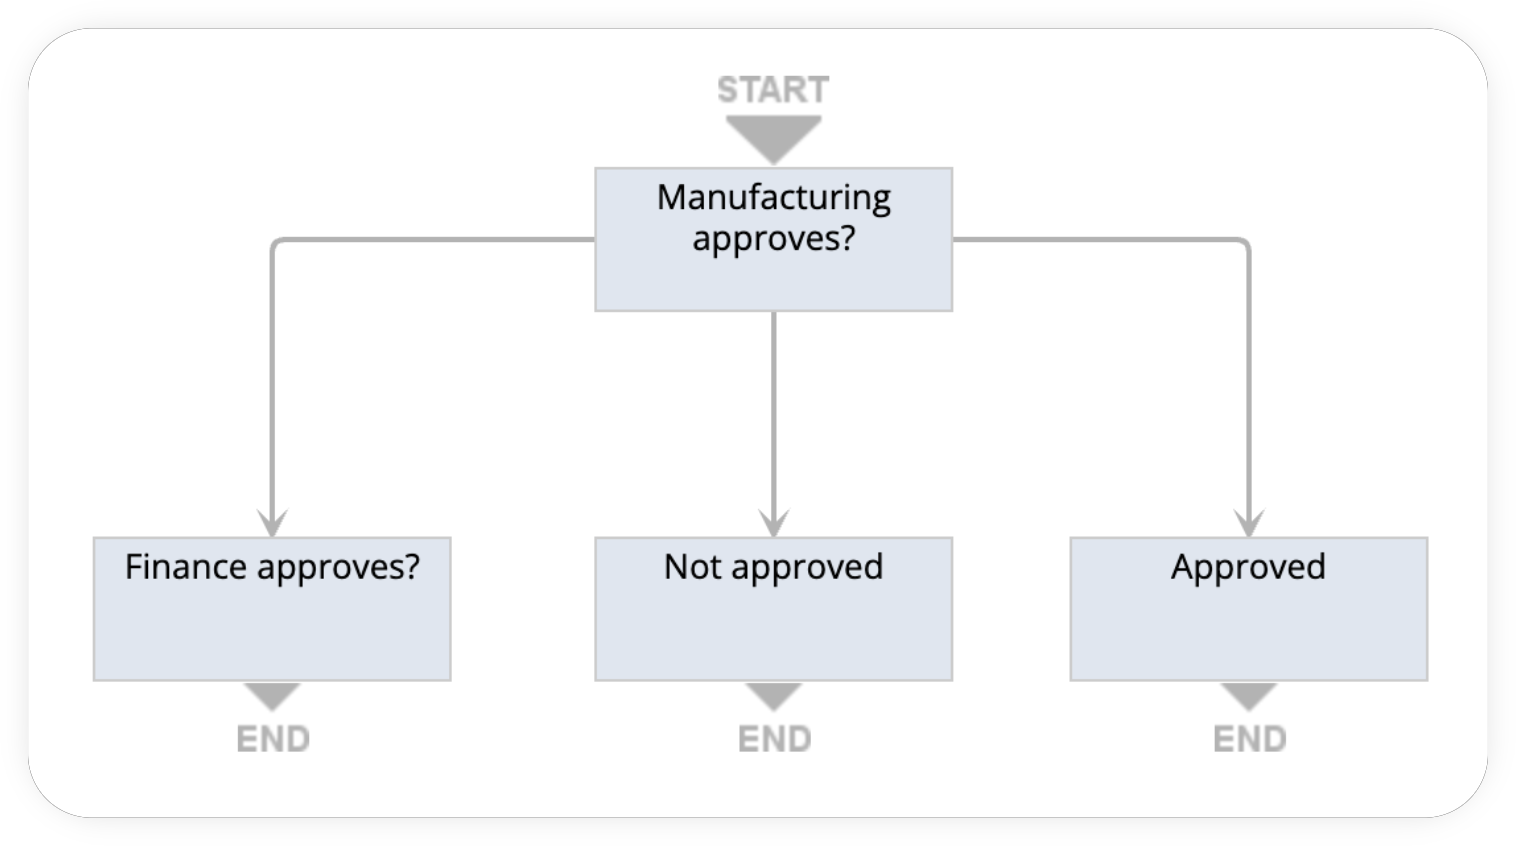
Before we start, let’s refresh ourselves on the approval flow we want to implement:

Let’s think about the UX we want to deliver:
After a PO has been created, anyone in manufacturing who opens that PO should see an approve + deny button. No other role should see those buttons.
Once manufacturing approves and assuming the PO’s amount is > $1000, the manufacturing team should no longer see those buttons on the PO; the finance team should.
The finance team should act using one of those two buttons, and so on, so forth.
Let’s first add those buttons. Create a new state, name it “Manufacturing approves?”. This state will be entered every time a PO is created because it’s an initial state, with no entry conditions. Once inside, create a new Action. Actions are the bits of logic that run when a state is active.

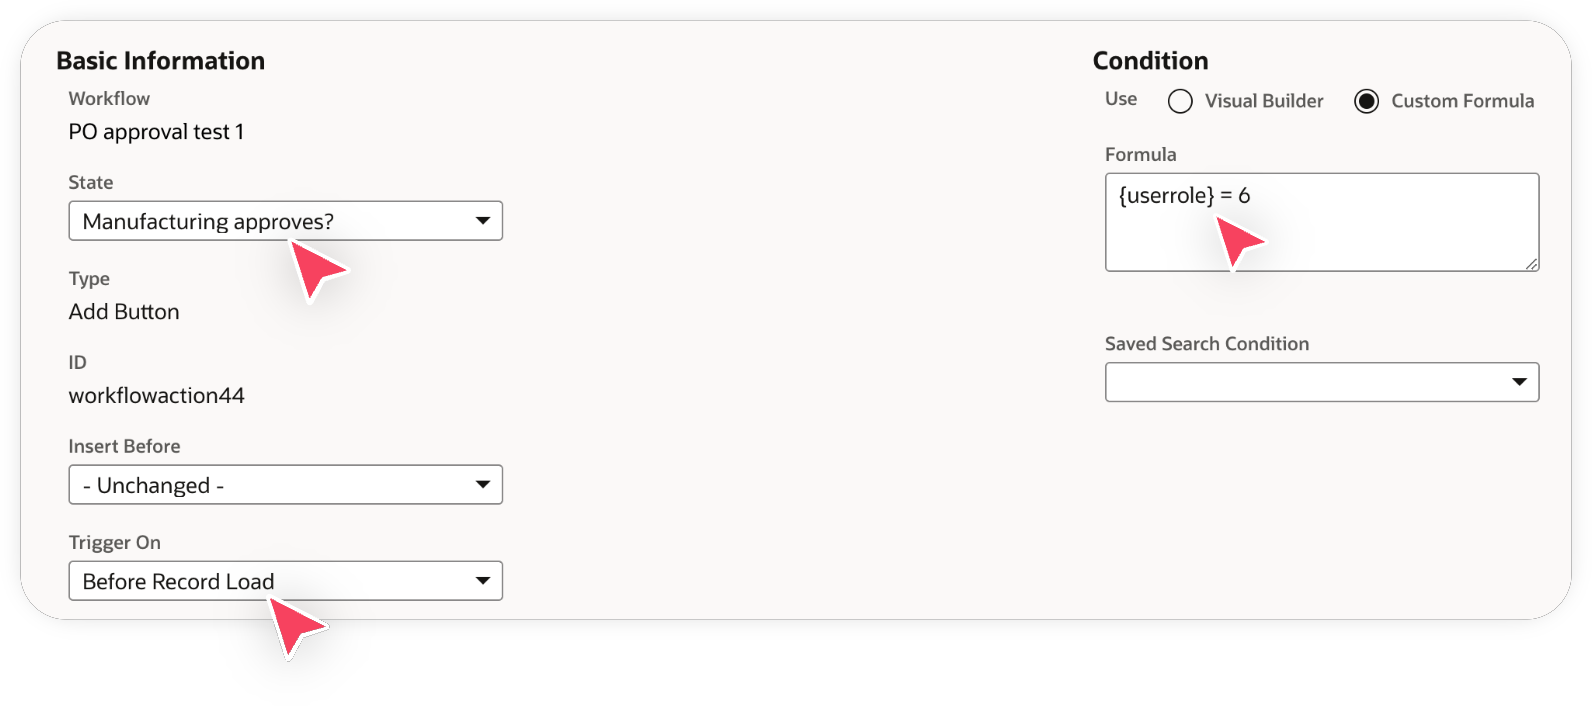
For the type of Action, choose ‘Add Button’. We want this to render every time the record is loaded. Critically, we only want it to show if it’s someone with the manufacturing role loading this record (or PO).
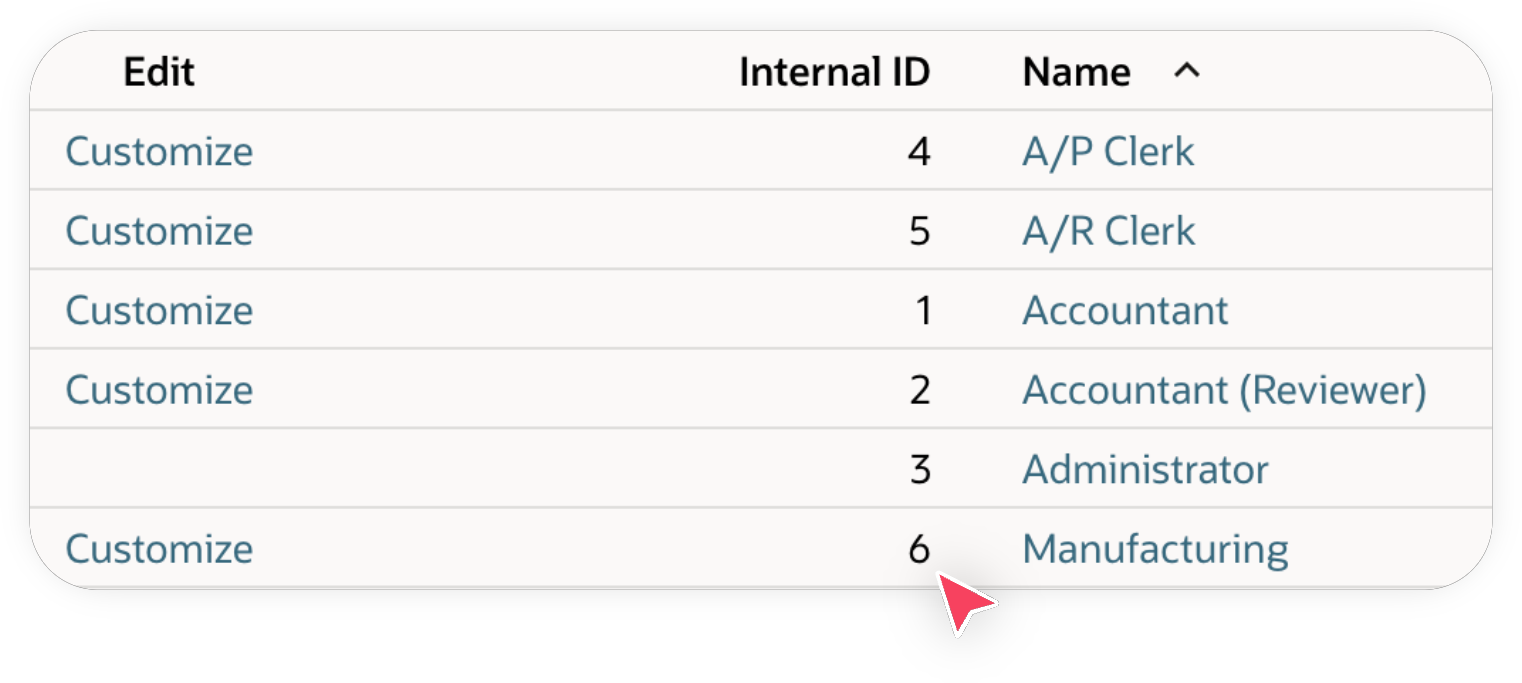
We need to know the ID behind that role to perform this check. On another tab, go to Setup→User/Roles→Manage Roles find the internal ID behind the role we’re interested in:
In our case, it’s
6. Let’s go back to our Action, and create it.

Breaking this down:
This is logic that runs in the ‘Manufacturing approves?’ state, which is the initial state of this workflow which is triggered when a PO is created.
The button is only rendered on the PO if the user’s role is 6.
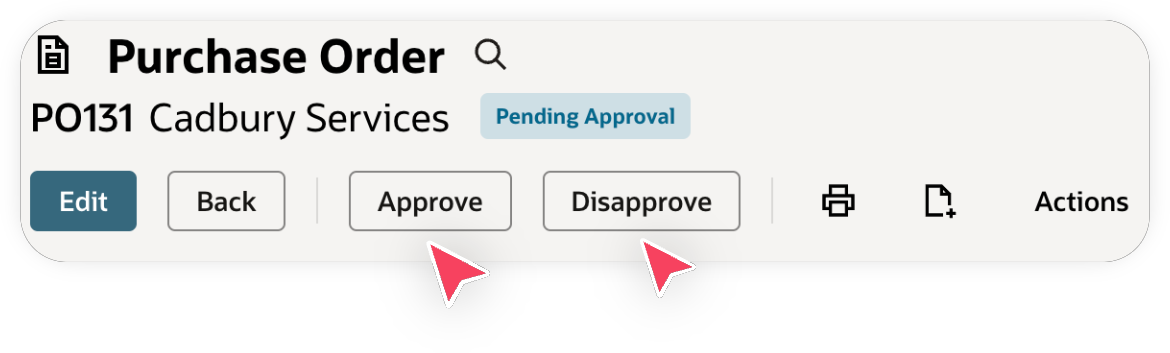
The button will appear as “Approve” on the PO page.
There’s a lot going on here. Make sure you understand this step before proceeding.Repeat the above step and create a ‘Disapprove’ button in the same “Manufacturing approves?” state. At the end, you should have something like this:

Let’s check if our buttons appear. Remember, we can’t check on an existing PO because this workflow is set to only act on POs created after the workflow itself was created. So let’s create a new PO and check:

We see the two buttons 🤙 Let’s handle the “Disapprove” case first, since it’s the simplest. Let’s create another state called “Not approved”. In it, let’s create an Action of type “Set Field Value”. This does what you expect - once we enter this state, this action (or logic) will run and set a field to a particular value.
In our case, we want theApproval Statusfield set toRejected:
Now we have two states…but they’re not connected. NetSuite calls connections between states Transitions (or edges, for my graph theory friends). Click on the initial “Manufacturing approves?” state and let’s create a transition:

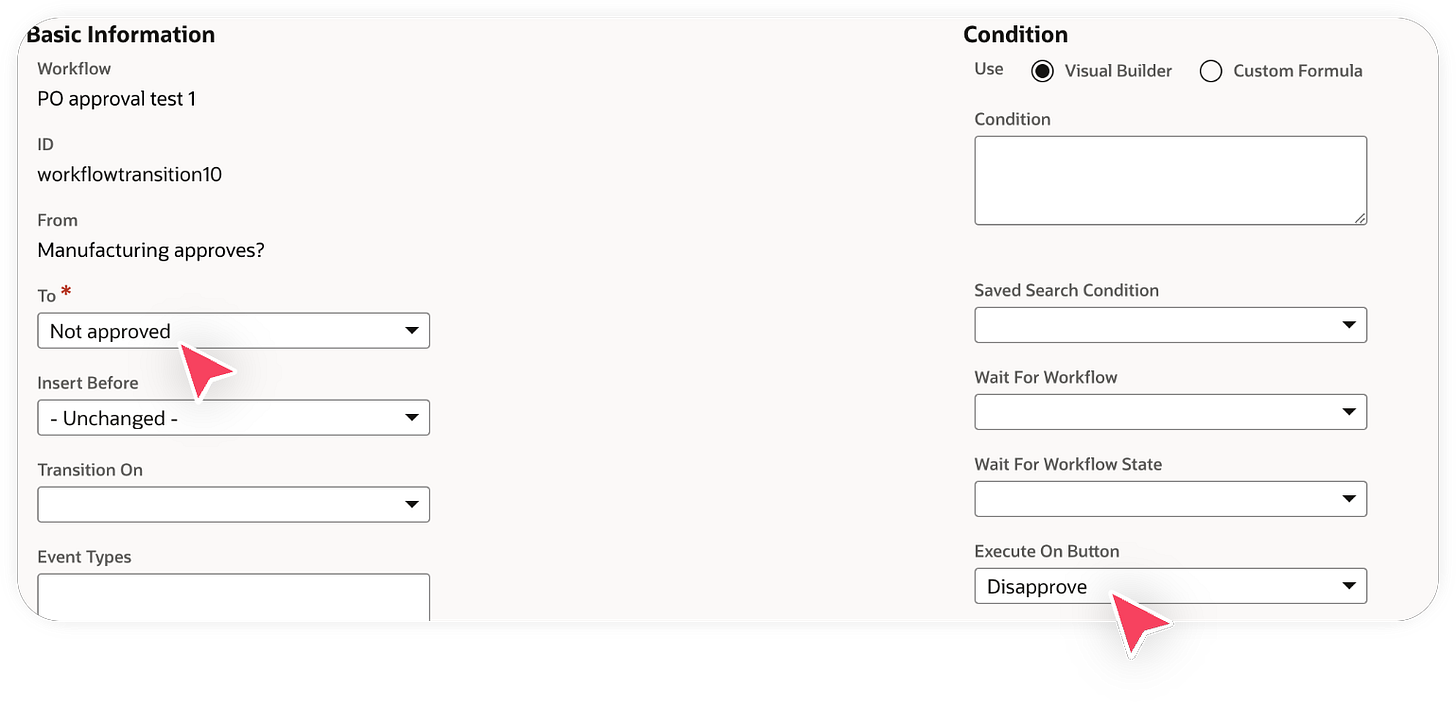
Here, let’s set the Transition to end on the “Not Approved” state. Let’s trigger the edge when the “Disapprove” button is clicked:
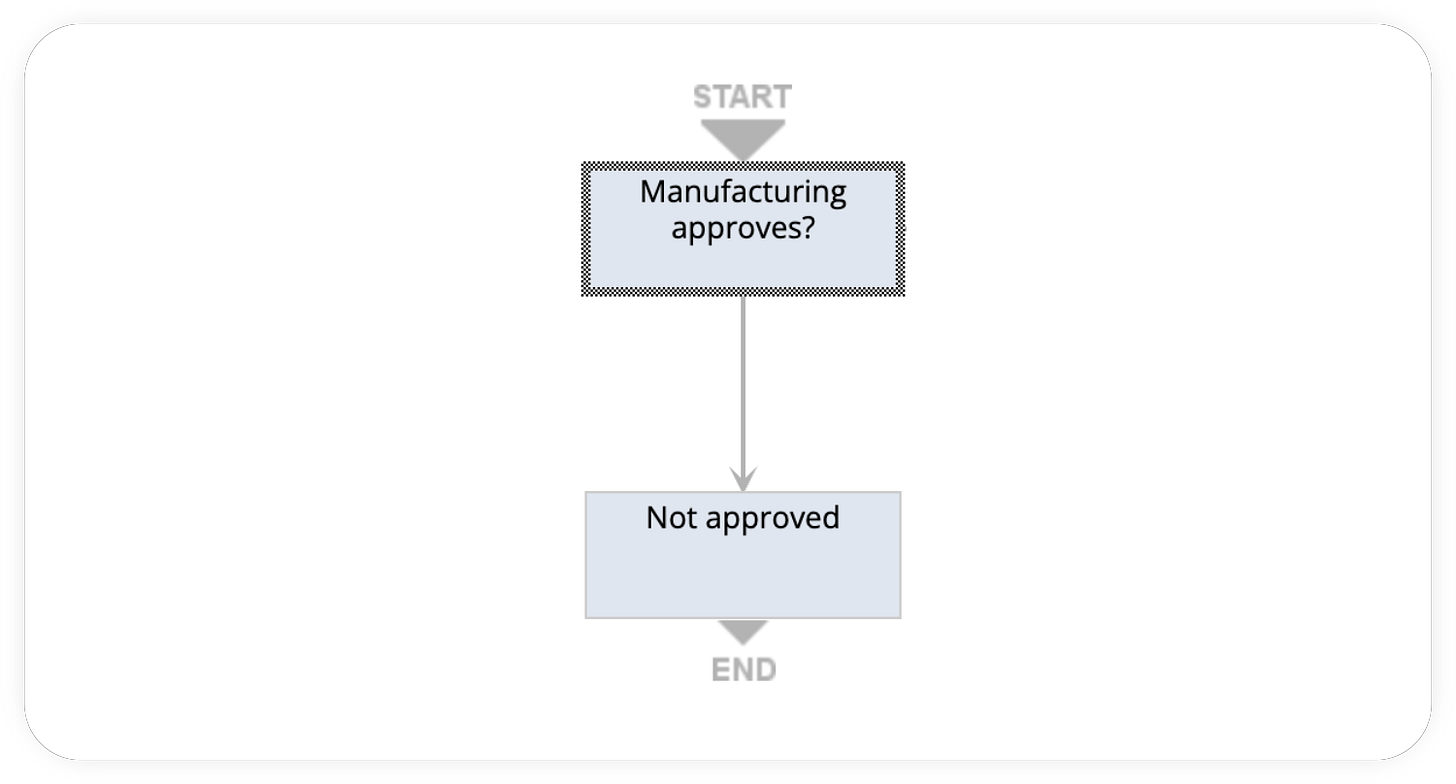
Which leaves us with a nice two state workflow:
If only every workflow was this simple. Let’s head back to our PO, and click the ‘Disapprove’ button:

Working as expected 🤙 Now we need to handle the case where the PO is approved by manufacturing. There’s a branch in the logic here:
if po.amount > 1000:
   finance_needs_to_approve()
elif p.amount <= 1000:
   po.set_status(approved)
Let’s first create those two states: “Finance approves?” and “Approved”.
The “Approved” state will have the same Action as the “Not approved” state, with the logic adjusted to set
Approval StatustoRejected.
Let’s hold off on the Actions inside the “Finance approves?” state. At this point, we should have:
Let’s wire up those Transitions, shall we? Re-examining our logic:
if po.amount > 1000:
   finance_needs_to_approve()
elif p.amount <= 1000:
   po.set_status(approved)
We need to make two transitions, each with different conditions to activate on. Click on the “Manufacturing approves?” state and create a new transition to the “Finance approves?” state:

Here,
totalis a field that represents the full amount (that is, the sum of the line items) on a PO. This transition only activates when that condition is true and the “Approve” button was clicked while in the “Manufacturing approves?” state.And you can probably guess what the transition to the “Approved” state looks like:
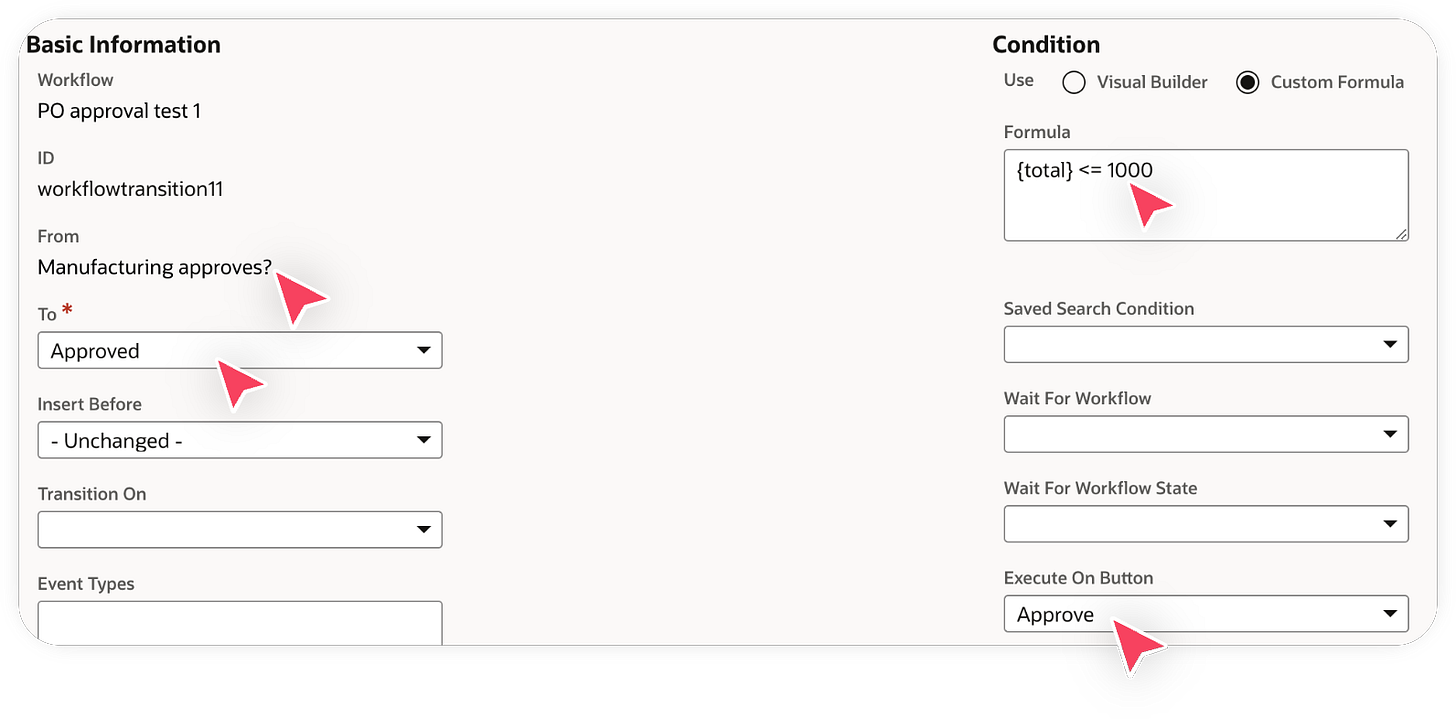
Notice that both transitions have the same “Execute On Button” value. It’s very important that they have a distinguishing condition, which is where the formula comes in.
At the end of it, we have the following workflow:
Let’s take a PO < $1000 and approve it:

Groovy 🤙 And let’s take a PO >= $1000 and approve it:

Which is good! The status should remain unchanged because it’s now up to the Finance team to approve it. We know the buttons disappeared (which is good) but it’d be nice to have some firm proof this PO moved to the “Finance approves?” state.
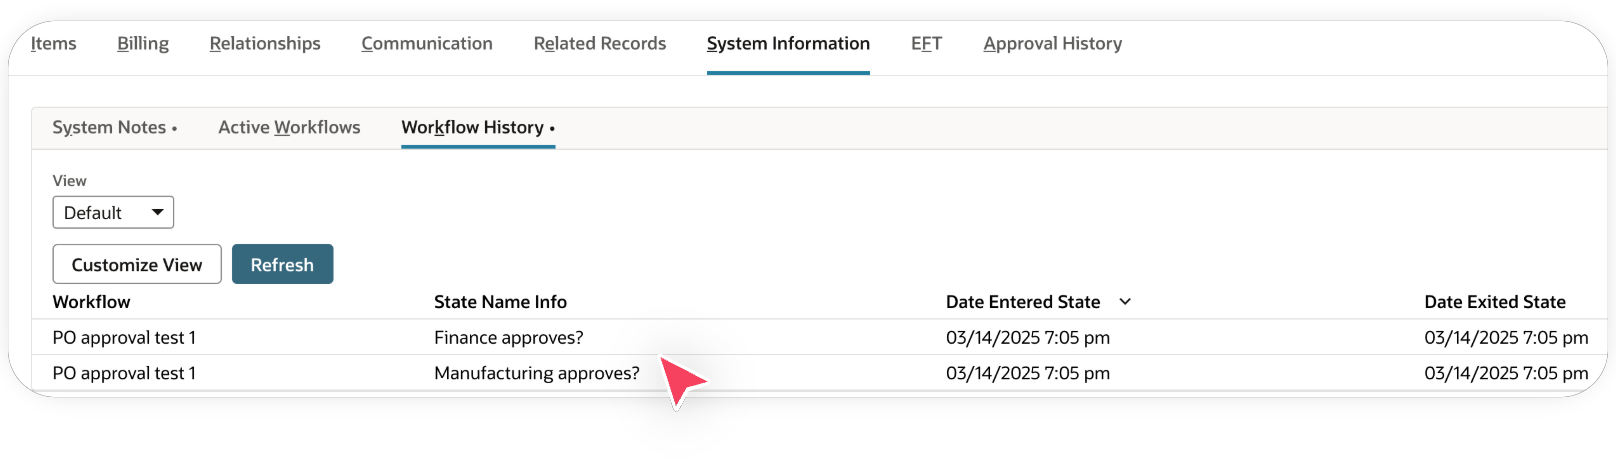
Turns out NetSuite has a way to view the log on a workflow, by clicking on System Information→Workflow History on the PO page:
This log is in reverse chronological order (latest event first). And as we can see, the PO successfully entered the “Finance approves?” state!


We now have the four ingredients for creating the entire workflow:
Creating buttons inside a state, via actions
Wiring those buttons to a particular transition, which connects one state to another
Having the ability to add conditions on these transitions
Being able to change a field’s value once in a state
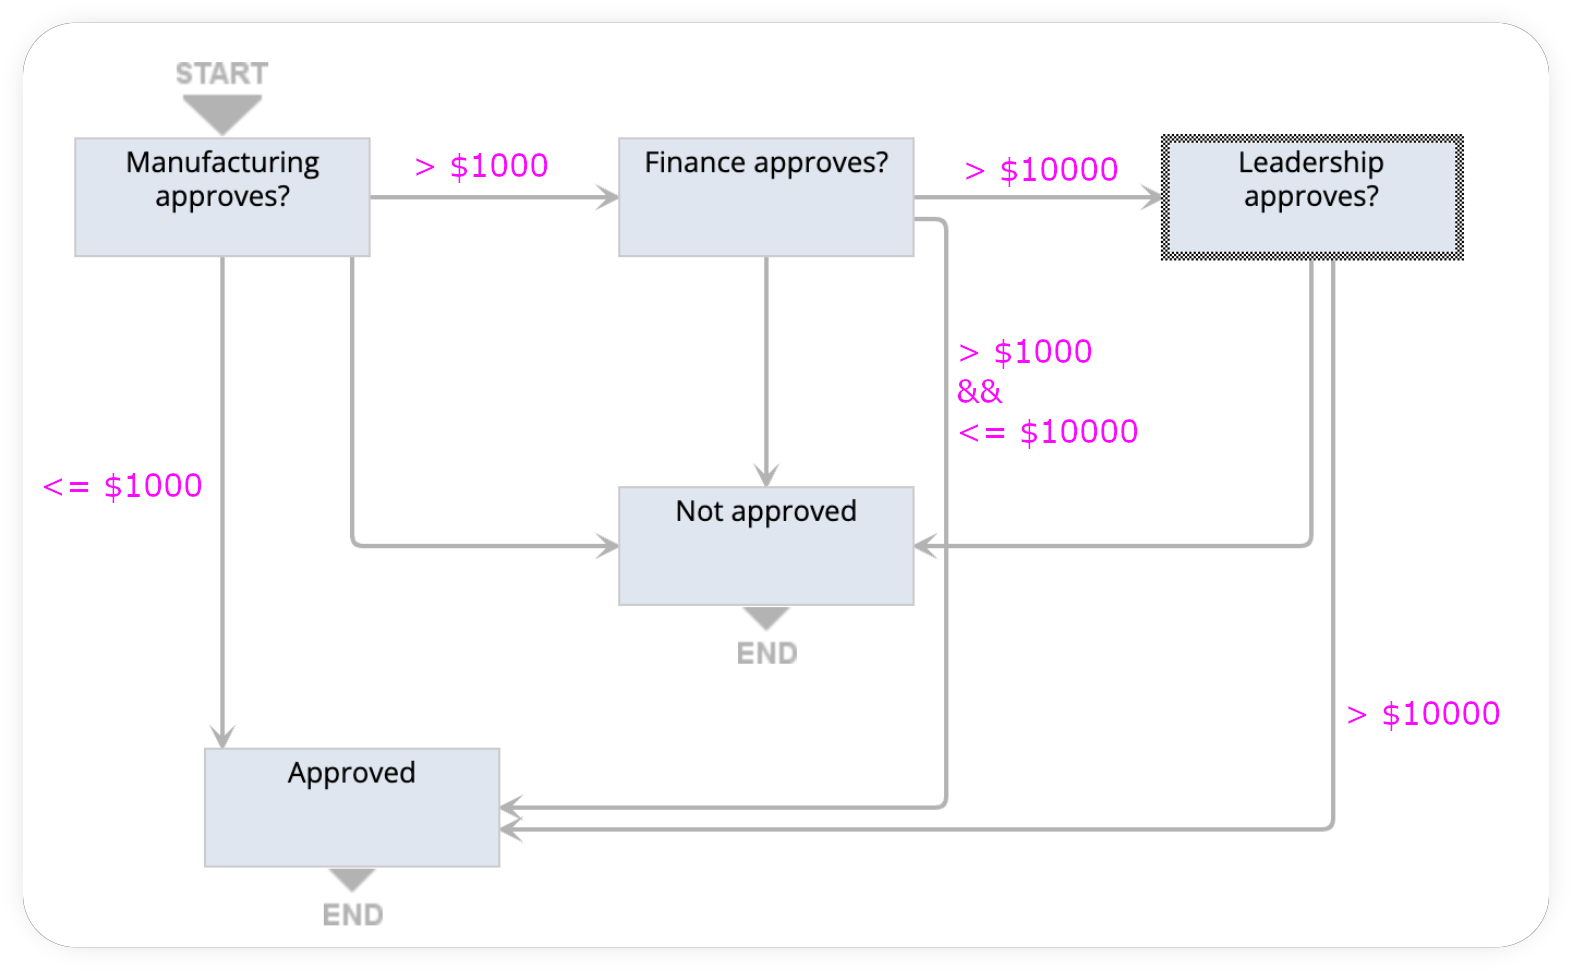
I won’t walk through the remaining steps but you have everything you need to get there. The final workflow will look like this, with annotated transitions to describe when the PO amount conditions are active:
Congratulations, you just created a multi-level PO approval flow using SuiteFlow!
If you’re interested in my NetSuite services (technical or functional), I currently have availability for 2025. Please message me on LinkedIn.